Last time we dealt with connecting your module up, This time we will look at the controls.
All the Beier systems have proportional channel inputs, these are basically the outputs from your reciever. They are generally labelled a prop 1 ... prop x. Please do not confuse this with your receiver output.
On the UFR1230 and the SFR1, things start out less confusing as both have X1 and X2 wired inputs that take the throttle output from your Receiver. On Futaba type systems this is likely to be Ch3 on Spektrum it is usually Ch1.On both the SFR1 and the UFR1230 you have to set the throttle up. You can do the set up from the modul or via the usb connection. You need to connect ALL the channels you will use and turn the TX on. Turn the unit on and initiate the set up. The unit will store the neutral position of all the channels. wait 2 seconds and move the throttle to full throttle for 2 seconds. wait for 5 seconds and apply full reverse throttle for 2 seconds. ( On the SFR 1 a blue led will flash at each point. The unit is "dead" whilst the set up is underway.
The USM-RC-2 is a little different in that Prop1 and 2 have through ports (in and out) Prop 1 is for the throttle ( there are two sets of pins marked 1.) and prop 2 is for the steering if you elect to use it ( I recommend not on base set up as it uses up a set of 8 choices).
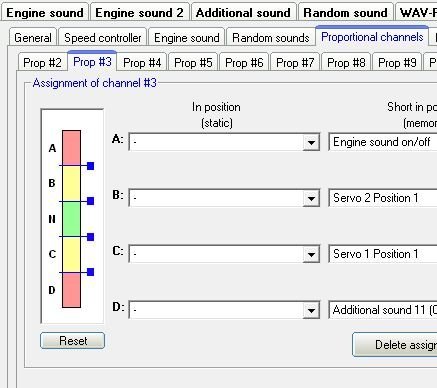
The neutral positions can be set in the programming if required and there are presets for different makes of radio. You can see the presets on the right hand side of the following picture.
The proportional channels tab is very similar on the SFR1 so we will not repeat. The UFR1230 is much simpler and self explanatory.
All the units have a number of ways to control the actions (as opposed to steering and throttle) what it does proportional channels, EKMFA ( NOT on UFR1230) and Nautic. Proportional channels are the control channels used to control the unit.
To use either EKMFA or Nautic modes you must enable them. its either or!
Whichever method you use, the channel needs to be able to go to 5 positions in order to get the best from the unit. The positions are neutral, half stick and full stick see the picture. The block on the left shows the default positions of each. these are basically 50 and 100% of the channel output. You either need to program your transmitter to use a dual rate or mix function to give these outputs based on the position of a switch and the channel (stick or switch) OR adjust the positions, within the application, to work with full stick and trim.
If you do not have a programable transmitter then it may still be possible to use it by adjusting the ABCD positions using a combination of full stick and trim. The positions of ABC and D can be altered by dragging the blue squares up and down on the display. To activate you have to save to the module! In the picture above the 100% position (top of A) represents 2.0 ms and the bottom of a approximately 1.75. Normal stick movement is around 1.8 to 1.9 ms without the trim so try dragging the blue square at the bottom of A upwards to 80 or 90%. Then try full stick ( that should give you B) and from neutral trim and full stick ( you may have to adjust the green neatral band in the same way). You will have to do this for all the channels that you are using on the unit!
So now each channel that has been set up there can be 8 choices af action, two for each position. A short time in position (50 ms) or a long time (1500 ms or 1.5 seconds) these ar adjustable on the proportional channels tab Bottom right - activation delay. My view is that 1.5 seconds sometimes seems like a life time! There is a third option of in position and if that is chosen then the action occurs whilst the channel is in that position (e.g. some of the supplied horn sounds).
EKFMA
With the “One-channel multi-function selection” (EKMFA) you can control up to 30 functions with only one proportional channel (channel #3).
You can assign in the Sound-Teacher the functions you would like to trigger with the EKMFA-modein the EKMFA tab of the configuration tab. To trigger a particular sound or function, the transmitter switch or joy-stick must be moved from neatral to position A (full up) or D (full down) for a certain number times (1-15).
The last „function“ is always stored, enabling you to repeat the last sound or the last function as many times as you wish, without counting once more. Simply hold the joy-stick for one second in the position B, or C to repeat the last sound.
In order to switch the 16 outputs directly, they must be configured in the Sound-Teacher as “static“, “flashing“ or “pulse“. An output that is configured e.g. as reversing or brake light, cannot be switched on.
NAUTIC
Nautic is for use with the Futaba F 14/16 or Robbe, graupner Beier or other modules of the type. You can have one or two switch modules installed in your transmitter, the first 8 will appear as nautic 1 on channel 3 and the second 8 as nautic 2 on channel 4 . The switch functions are assigned under the nautic tab in configuration.
SBUS and SUMD
SBUS and Sumd are serial controls that can carry up to 16 channels of data on one input. SBUS was the first and designed by Futaba, SUMD is the graupner HOTT version. On the USM-RC-2 SBUS and SUMD can be activated on prop 4 . On The SFR1 they are both on Ch 6. The USM can only take the first 10 available channels but The SFR1 can take 16 channels. The UFR1230 does not have this capability.
I use SBUS on all my models and it extends what I can do. I am lucky to have a DX18 an early Gen 2 that is both DSM2 and DSMX compatible. I use OrangeRX receivers in the trucks but make sure I buy the ones with Sbus outputs. The only thing to be aware off is that the first 4 channels come out in Futaba order on Sbus so although throttle is Receiver channel 1 on the s bus it is ch 3 - which can cause a bit of confusion.
With either of these protocols it is best to use the designated receiver channel output for Throttle and steering.