This articles deals with what you can do with the Beier modules over and above the basic functionality that we have dealt with so far.
DIAGNOSTICS
The first stop is recording and viewing diagnostic information. The USM-RC-2 and the SFR1 are both capable of recording diagnostic information onto the SD card and their teacher applications can play that information back. The USM-RC-2, the SFR1 and the UFR1230 can also show diagnostic information via the data cable.

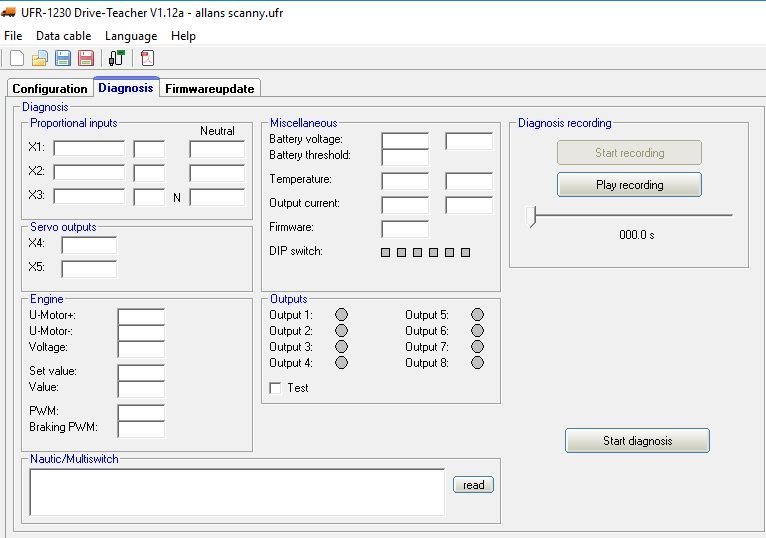
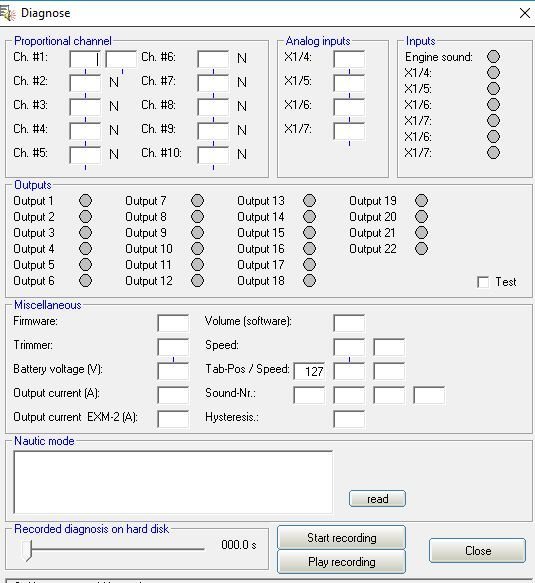
The pictures above are the diagnostic windows for the 3 of the modules. You can see that the information is pretty much the same on all 3.
To record diagnostic dat on the SD card you first need tick the "Record Diagnosis on SD card" option which is in the general tab under configuration. Now save the project and put the sd card in the unit. turn everything on and as soon as you do anything the diagnostic data will be recorded. try running through all the channels with full stick and minimum stick. now turn off, reinsert the sd card in the carrier and plug in to the computer. Now select diagnosis via sd card on the teacher, for the USM-RC-2 this is in the help menu. For the SFR1 it is in the SD card menu. now select play.
Its easier with the K-USB programmer cable connected. turn your transmitter on, turn the model on and then select diagnosis via data cable. It is in the help menu for the USM-RC-2, under datacable for the SFR1 and since the UFR1230 needs the program cable it is assumed and there is a seperate tab for diagnosis. You can now activate the channels and watch what happens in the diagnosis windo AND on the model. You can for example check the channel positions, trigger a function and check the effect or turn outputs on. If an output is on it will show in the diagnostic window so if that is showing but not on the model it is time to check the wiring. There is a lot of information available so have a play. If by any chance you have a problem and refer it to Beier it is likely that they will ask for the diagnostic files so its good to understand it.
SERVOS
The USM-RC-2 and the SFR1 both have two servo outputs, all 3 units can drive two servos on the IR unit. Each servo can be made to go to upa to 5 positions either as a command or as part of a sequence of movements.
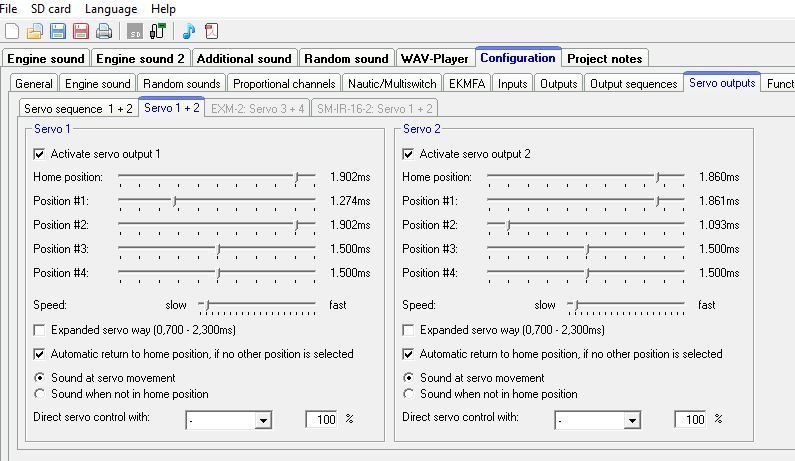
The picture shows the settings screen for servos 1 and 2 in the servo 1+2 tab under servo outputs in the configuration tab (SM-IR-2 tab on the UFR1230). You can clearly see the position settings one of which is the home position. This example is from my wrecker, servo 1 operates the side doors and servo 2 operates the stealth axle, you could though use this to precisely set up servo positions for e.g. Tamiya elctric leg operation.
Although the servo settings are for home Position 1 and position 2 I only need home and position one as I have the Automatic return to home position, if no other position is selected box checked.I also have the movement set to slow so that my actions happen slowly, you can set any speed in between slow and normal servo speed (fast) though. I also have sound at servo movement set (more later). Oh and the Activate servo output 1 and 2 check boxes are selected.
Now when I select the function servo position 1 the servo travels to position 1 ( which I fine tuned to get it where I wanted by moving the slider and trying it). If I select servo position 1 again it actually deselects and the servo returns to the home position - again slowly.
Servo sequences are slighty different in that you can move to up to 10 positions.
The total number of step (2-10) is selected in the total steps box
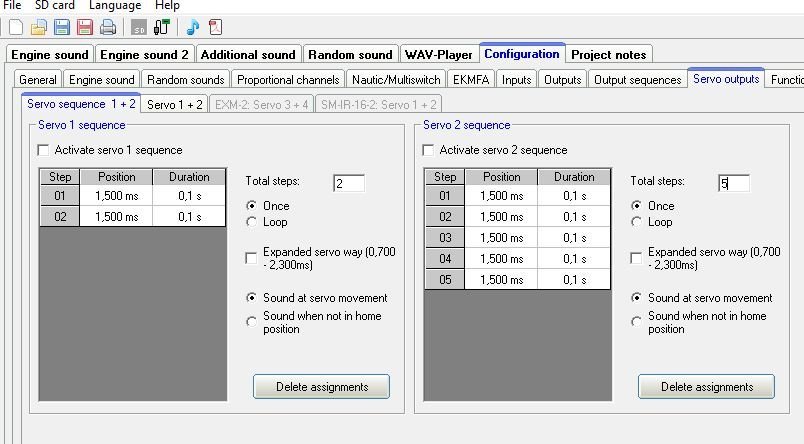
You can see that servo 1 has 2 locations and servo 2 has 5. They are all the same as I have not used them and so not set them up. Click the box under position and set the position via the drop down which goes in .01ms steps. Set all the postions you need (have specified) up. You can overdrive some servos and ticking the Expanded servo way box allows that. I have sound at servo movement ticked but you can have either or both stationary or movement set.
So where is the sound? Well its near the bottom of the additional sound tab.

You can see from the entries that each servo/ servo sequence can have sounds for left/right travel. I have different sounds specified so I get a different sound when the doors open to that when they close.
You can do all the same things with these sounds as the others so for example you could trigger a light output or an output sequence or a servo sequence.
OUTPUT SEQUENCES
Both the USM-RC-2 and the SFR1 are capable of runing sequences on their outputs. The UFR1230 cannot.
Both units can run up to 8 sequences. The USM-RC-2 can only run one at a time but the SFR1 can run all 8 at the same time.
The picture below shows the sequence set up window.
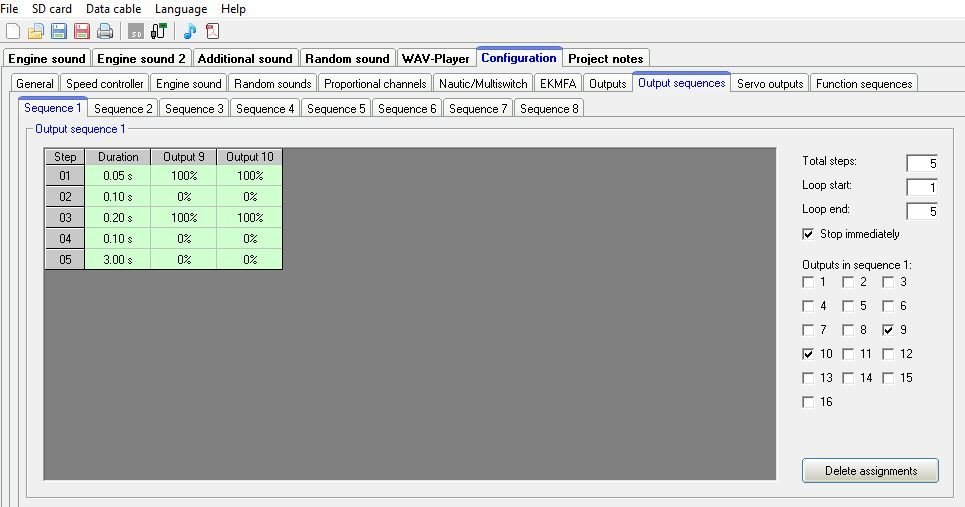
Lets go through it. You can see there are 8 tabs labelled sequence 1-8. Each sequence will hove outputs selected by the tick boxes on the right, in this case 9 and 10. As you tick the boxes a column will appear in the main window for each selected output. Above those boxes are boxes to select the number of steps ( changing this will change the numer of rows displayed, a default sequence shows 10 rows), the start row and the finish row and whether the sequence will stop immediately or loo till it finishes. The picture shows sequence 1 which has 5 steps, after each step is a time ( for that step ) and then a column wher you can define the output intensity of that step( this enables you to program a sequence where the intensity gradually appears or disappears e.g. to make trailing lights). so in this sequence outputs 9 and 10 are on for 0.05 second , off for 0.1 seconds on again for 0.05 seconds and then off for 3.1 seconds.
The sequence is selected as a function choice and is in position (runs while the stick is there ) or on/off i.e. on first time chosen and next time off.
RANDOM SOUNDS
You set up the random sounds in the main random sound tab. Its a file choice just like engine and additional sounds and has the same capabilities so I will not dwell.
The configuration for the random sounds is done in the random sounds tab under configuration, no picture as the tab is self explanatory. The random sounds that you have declared will appear on the left then there are columns for the repeat time minimum and maximum in seconds . Then tick boxes to say whether the sound can happen when stationary and in motion and then whther they can happen with the engine sound on or off. At the bottom there are boxes for whether the random sounds can be played at any time or only when enabled by the random sound function. and finally a tick box to indicayte whether you can play more than one random sound at a time. I would suggest one at a time ;)