

So now we know how to connect the unit and set the radio up to control it and how to manipulate the proportional channels, but what do we control? Well essentially we control one or more of a number of functions.
The list is rather large and this is where things get a bit tricky as you may set up and control the functions but unless there is some order to it it will be extremely difficult to remember what is what. I have been using the Beier modules for a number of years and so have come to a method that works for me. It essentially revolves around grouping actions together on one channel. So I will have lights on one channel, horns on another, selectable sounds , engine controls etc.
If you activate one of the drop downs on one of the proprtional channel tabs then the following page pops up.

This is a list of all the funtions that are available for use. This picture is from the SFR1 but the USM-RC-2 is similar, the UFR1230 is rather simpler but has the same principles. You will see that the functions are grouped together, Sounds, Lights, Servos, SM-IR-16-2 etc. you can attach a function to the proportional channel location you selected simply by clicking the radio button. Where a function is greyed out ( like servo 1 at the middle bottom) this is usually because it has not been activated.
There are a lot of sounds in the additional sound list and you can see that a lot of slots are empty. We will deal with these later. Also note that the USM-RC-2 has no speed controller controls.
LIGHTS
The second column across lists outputs and output sequences. The SFR1 has 16 outputs and the USM-RC-2 has 10 (or 12).
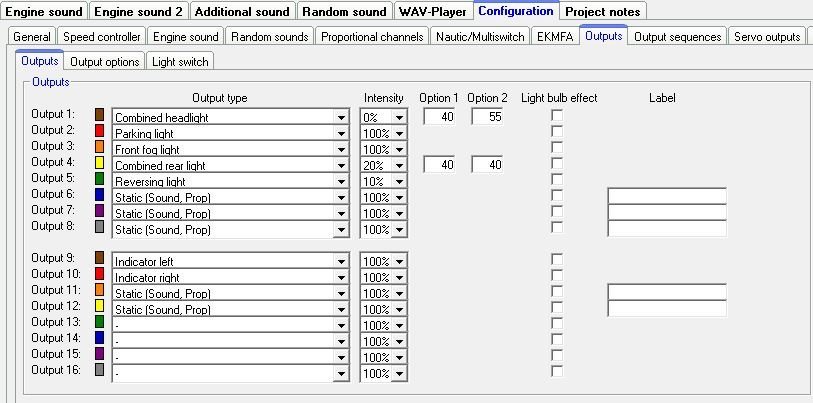
The picture above shows the outputs tab (under configuration). You can see that there are 16 outputs here (its 10 or 12 on the USM-RC-2) and you can use them all for LEDs, relays, smoke generators etc. They are very capable but as I have said in a previous article they have no current protection so a bit of care is in order. You can see here that I have used the drop down selector to choose named lights in many of the locations. On the right there is a row labelled Light Bulb Effect, tick this and the outputs will mimic incandescent bulbs. You can set the intensity in the intensity column. You can see in output 1 I have selected combined headlight, doing that also pops up two more boxes option 1 and option 2. The main intensity is now for the side lights, next is headlights and next full beam. The total should not exceed 100!
In the selection window (first picture above), at the top of the third row across, you can see lights + and lights -, followed by a list of named lights. The lights+ and lights - allow me to use a light sequencer and save a few selections, It also follows what would happen in your car on the lightswitch, i.e. side lights, headlights, main beam etc. We will leave the second tab (output options ) and go straight for the third tab labelled light switch. This is where you can define the light sequence.

You can set up to 6 steps ( 4 in this case). In the grid you can define what happens or can happen at each step. clicking on a squere will toggle the * to a space and vice versa. Some of the options may appear odd but you could use this sequence to control other things by using the the other outputs.
In order for the outputs to work you need to add leds and resistors. There is a resistor calculator here led-calculator .
A bit of planning is in order before you decide what lights go where. Its a good idea to have similar lights grouped together so all the front lights in consecutive outputs. The example does not show it as this grew a bit like topsy as I added more capability! grouping the outputs enables you to split the flat cable and run it as a smaller flat cable - plus of course the positive supply. I put the resistors next to the leds as again I can run a flat cable. There are other connection methods using AKL units. The AKL-x-W units have slots for plug in resistors and a selection of resistors and that can make it easier.
SOUNDS
There are 5 types of sounds that can be loaded to the soundteacher and so on to the sd card. Engine sound, Engine sound 2 , Additional sounds, Random sounds and wav player sounds. Each has a tab on the main screen . The engine sound tab looks like this:-
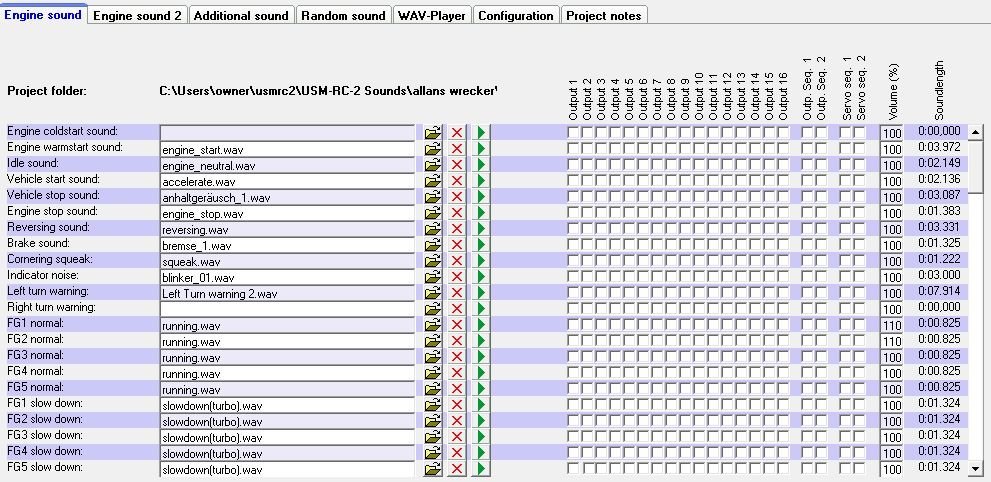
It looks a little complicated but we will go through the rows and columns slowly. Lets start with the first line Engine coldstart sound. the file name box is empty and because of that this will not be used. If you want a cold start sound then you will have to load one or maybe even use the sound software to modify an existing sound and use that. To load a sound click on the folder icon in column 3, then navigate to the sound select it and click open. The sound file name will appear where there was a blank. the red X in the next column will emty the sound slot. The green arrow will play the sound so you can hear it and make sure its the right one. To the right are columns of boxes with labels at the top if you click a box then the box will have a tick, a second click clears it. A ticked box will associate the output, output sequence or servo sequence with the sound, particularly useful for tanks and gunfire. The next box is for the volume and the last box is the sound clip length. Scrolling down the screen you will see there are a lot of possible slots. they do not all need to be filled as normally the sound will default to the first instance.
Engine sound 2 is similar but not as much - it is for an auxiliary engine. for eaxple large plant sometimes has a small engine that is used to start its large one. This is wher you would configure that.
Additional sounds is where sounds not associated with the engine/brakes live. So horns air release, door open and close, Compressor etc etc. The first two sounds are designed to loop and play whilst the selectin is in position and so have a start a middle and an end. The remaining sounds have columns of radio buttons that enable you to choose how they play once/complete, once immediate stop, loop/complete and loop immediate stop. The loop ones presuppose that the selection is "in position"! the remaining columns are just like previous screens.
Random sounds are where sounds that can occur randomly are loaded. These are enabled and set up under the configuration sub tab random sounds. wher you can set the period whether they ocuur when stationary ir in motion and if the engine needs to be on or off for them to occur.
The Wav player screen is next and very similar to the other screens you can store up to 30 full music tracks or something like 2 hours of sound (e.g. a recorded radio program, converstaion etc) I have used this to play christmas songs - its annoying after a bit ;).
Thats it for this article.